
To create your first design in Canva, sign up for a free account, pick a template that matches your project, replace the placeholder text and images with your own, adjust the colors, then download it as a PNG or PDF. The process takes about 15 minutes once you know where the tools are.
Canva looks simple, and that is the point. It hides the complexity of graphic design software behind a drag-and-drop interface anyone can learn in an afternoon. But simple does not mean limited. Millions of small businesses run their entire visual presence on Canva: social posts, flyers, presentations, logos, and more. This tutorial walks through the real workflow, not just a tour of buttons.
What Is Canva and Is It Really Free?
Canva is a browser-based design tool for creating visual content without installing software or learning professional programs. The free plan includes thousands of templates, stock photos, and all core editing tools. Canva Pro ($120/year) adds background removal and brand kits. For beginners, the free plan handles social graphics, flyers, presentations, and simple logos.
The catch with free is worth understanding upfront. Some templates, photos, and fonts carry a small crown icon marking them as Pro. If you use a Pro element in a free account, Canva watermarks your download or asks you to pay $1 per element. Stick to free elements while learning. The free library is large enough that you will rarely feel constrained. When a design genuinely needs a Pro photo, that is the time to consider whether the subscription makes sense for your volume of work.
How Do You Set Up Your Canva Account?
Go to canva.com and sign up with Google, Facebook, or email. It takes two minutes: enter your details, confirm the email, and answer two questions about what you plan to design. Canva uses your answers to suggest templates. Skip the Pro trial during signup unless you want to test premium features now.
Once inside, spend five minutes learning the layout. The left sidebar holds everything you add to designs: Templates, Elements (shapes, icons, lines), Uploads (your own files), Text, and Photos. The center is your canvas. The top bar has undo, the design title (click to rename), Share, and Download. The toolbar above the canvas changes based on what you have selected: click text and you get font controls, click an image and you get crop and filter options. This context-sensitive toolbar is the key to Canva feeling simple.
How Do Templates Work in Canva?
Templates are pre-designed layouts sized for specific uses: Instagram posts, flyers, slides, thumbnails, and more. Every element (text, images, shapes) can be changed, moved, or deleted. Sizing and spacing are already handled. Your job is swapping placeholder content for your own words and images, then adjusting colors and fonts.
To find one, use the search bar at the top of the home screen and type what you need: “Instagram post,” “resume,” “birthday invitation.” Filter results using the sidebar: free versus Pro, color, style. Click a template to preview it, then click “Customize this template” to open it in the editor. Do not feel locked to the template’s topic. A “coffee shop flyer” template works fine as a yoga class flyer once you swap the text and photo. The layout is what matters, not the original subject.
How Do You Add and Edit Text in Canva?
Click any template text to edit it: a toolbar appears with font, size, color, and alignment controls. To add new text, open the Text tab and choose a heading, subheading, or body text preset, then drag it into place. Canva suggests font pairings under “Font combinations.” Limit yourself to two fonts per design: one for headings, one for body.
Three text habits separate decent designs from amateur ones. First, keep text short. A flyer with 200 words gets skimmed; one with 40 words gets read. Second, use size contrast deliberately. Your headline should be obviously bigger than supporting text, not slightly bigger. Third, check readability at actual size. Zoom out to 100% and read your design from arm’s length. If you squint, the text is too small or the color contrast is too weak. Dark text on light backgrounds (or the reverse) works; medium gray on light gray does not.
How Do You Add Images and Graphics?
Canva offers three image sources: its photo library (Photos tab), your own uploads (Uploads tab), and icons and illustrations (Elements tab). Click or drag to add. To replace a template photo, drag your image onto the existing one: Canva swaps it while keeping size, position, and frame shape. This is the fastest way to personalize templates.
Once an image is on the canvas, click it to reveal editing options. Crop lets you reframe. Filters apply color looks with one click. “Edit photo” opens deeper tools: brightness, contrast, saturation, and the background remover (Pro only). For most beginner designs, two adjustments matter most: crop tightly so the subject fills its space, and check that the image is high enough resolution. A blurry photo ruins an otherwise clean design. Canva warns you with a small icon if an image is too low-resolution for its display size.
What Are Layers and Why Do They Matter?
Layers are the stacking order of elements: which thing sits on top. Every text box, image, and shape is its own layer. Right-click any element and use “Bring forward” or “Send backward” to reorder the stack. The “Position” button shows the full layer list, which helps when an element is buried under something else.
You will notice layers matter the moment a text box disappears behind a photo or a shape covers your headline. Instead of deleting and recreating, just reorder. A common beginner pattern: background image on the bottom layer, a semi-transparent shape above it to darken the photo, then white text on top for readability. That three-layer sandwich (image, overlay, text) is behind most professional-looking social graphics, and it takes 30 seconds once you understand stacking.
How Do You Export Your Design?
Click Share, then Download. Pick PNG for social media and web (crisp, supports transparency), JPG for smaller files, PDF Standard for home printing, or PDF Print for professional printing. PNG is the right default for most beginner projects. Use the size multiplier (2x or 3x) for sharper results on high-resolution screens.
Before downloading, do a final check at full zoom. Read every word for typos. Confirm nothing important sits too close to the edges (Canva shows margin guides). If your design has multiple pages, like a presentation, use the checkboxes to select which pages to download. Canva also lets you share a view-only link instead of a file, which is handy for getting feedback: Share, then “Copy link” with view access. The recipient sees the design in their browser without needing a Canva account.
What Should You Make First in Canva?
Start with projects that each teach one skill. A quote post teaches text layout. A flyer teaches hierarchy: headline, details, call to action. A presentation teaches consistency across pages. A thumbnail teaches bold, small-size readability. A simple logo teaches shapes and transparency. Five projects cover every core tool.
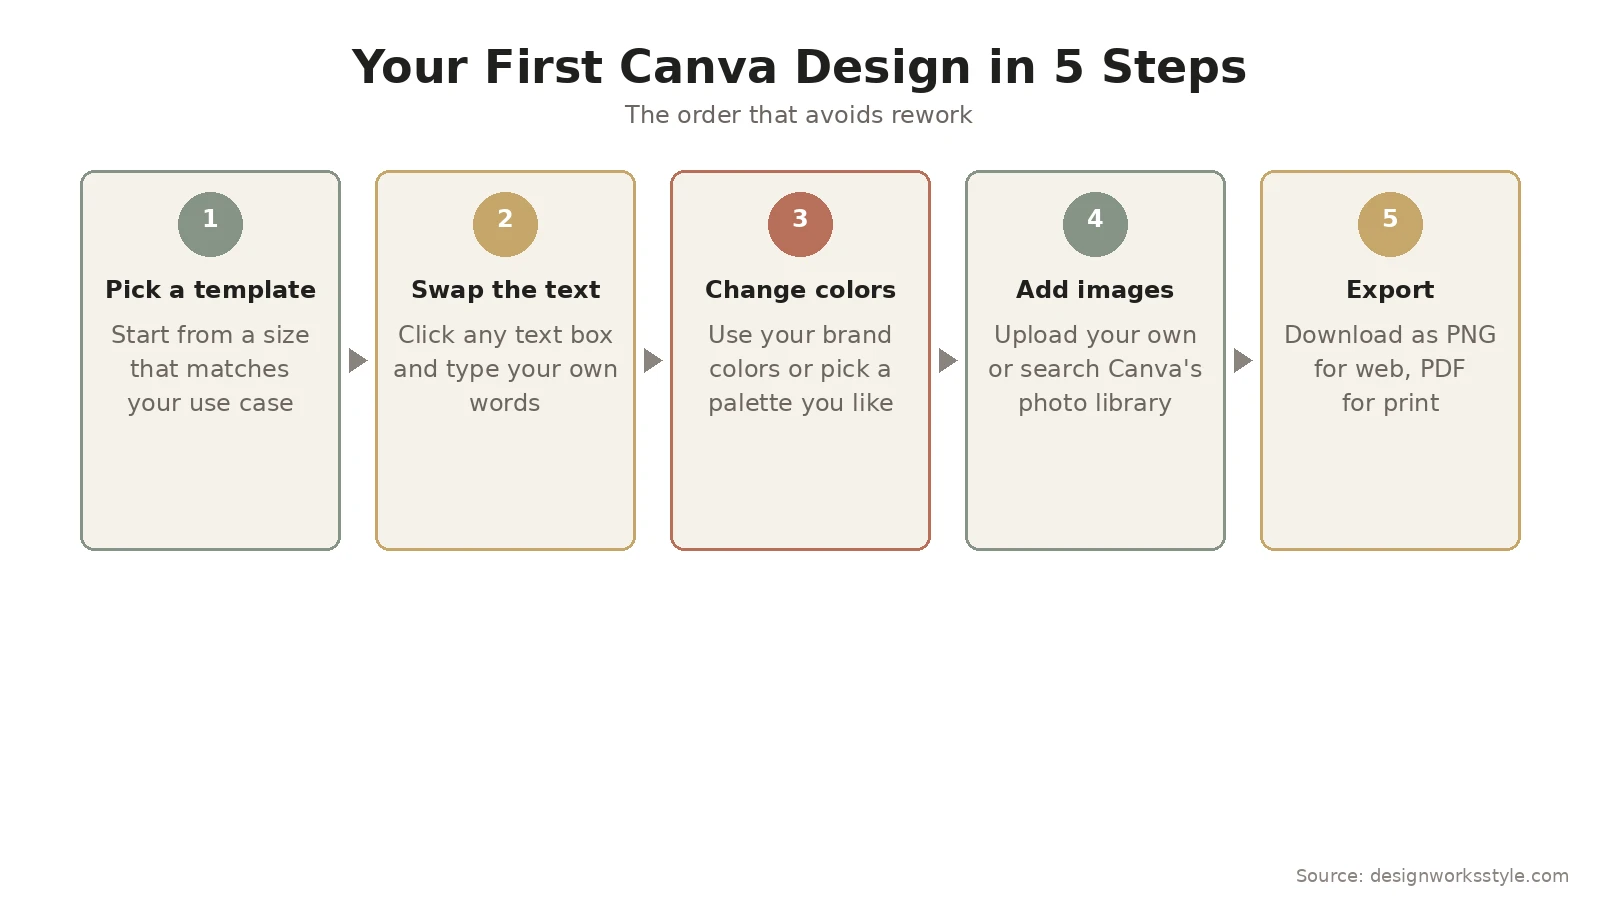
The order matters more than the project. Always work template first, then text, then colors, then images, then export. Beginners who start by hunting for the perfect photo waste an hour before writing a single word. Get the words right first. Text is the skeleton; everything else is decoration. Once the message is clear, the visual choices get easier because every decision serves the words.
Frequently Asked Questions
Is Canva really free for commercial use?
Yes, with conditions. Designs you create in Canva can be used commercially, but the license for individual stock photos and elements has limits: you cannot sell the stock content standalone (as stock), and some uses like trademarks have restrictions. Your own uploads and original arrangements are yours. For most small business uses (social posts, flyers, ads), the free license is fine. Read Canva’s content license if you plan merchandise or resale.
Canva vs Photoshop: which should a beginner learn?
Canva, unless you have a specific reason to need Photoshop. Canva handles layout, text, and simple photo edits in minutes. Photoshop offers pixel-level control but takes months to learn well. Many professionals use both: Canva for fast social and marketing graphics, Photoshop for detailed photo retouching. Start with Canva. You will know when you have outgrown it because you will keep hitting specific limitations.
Why does my Canva design look blurry when downloaded?
Usually one of three causes. The source image was low resolution: replace it with a higher-quality file. You downloaded at 1x for a large print: use 2x or 3x, or PDF Print. Or you stretched a small graphic too large: vector elements (icons, shapes) scale cleanly, but photos do not. Check Canva’s resolution warning icon on images before downloading.
Can I use my own fonts and brand colors in Canva?
Brand colors yes, on any plan: save hex codes in your design or note them somewhere handy. Custom font uploads require Canva Pro. On the free plan you are limited to Canva’s font library, which is large (over a thousand families) and includes solid options for most styles. If brand consistency matters enough to need exact fonts, that alone can justify Pro.